|
|
ITEMS TO GET: Potion (x3), Ether, Elixir, Phoenix Down, Eyedrop, Tent, Mage Masher, ? Wrist During the camp scenes, your party is healed, and Monty shows up again. An A.T.E. is triggered; it depicts two Moogles in a swamp. The Moogles will explain more about the game's battle system. Page through each lesson, then click the bottom option to leave. Before the party departs, Monty gives you a Key Item that allows you to summon Moogles on the world map.
You're then dropped onto the world map, unable to return to the Evil Forest. Garnet has now joined the party; equip with her a hat and wrist to bolster her defense. If you stole an Iron Helm from the Plant Brain, be sure to equip it on Steiner as well. If you want to save, press Square to call a Moogle. You can just enter the Ice Cavern from here, but there's a small side trip you'll probably want to make. Head due west from the Evil Forest until you reach the North Gate and press Circle to enter. The party converses; once you can move again, head up to the gate and activate the question mark. The guards won't let you in, but if you keep choosing the top option (you'll have to talk to the guards twice), you'll be given the chance to buy Potions for 50 gil each. Also, if you wiggle through the hole in the fence to the right, you can collect a Potion and an Eyedrop the difficult-to-see chests. There's one another stop you can make. In the crescent-shaped forest to the southeast of the Evil Forest, you can sometimes encounter the quiz master. You can earn some extra gil by answering his question correctly, though you don't really need the money. When you're done exploring this tiny corner of the world, you'll need to head through the Ice Cavern. It's the tiny gray cave located in the mountain range due south of the Evil Forest. If you can't find it, press Select to bring up the larger map, where it will appear as a dot. Once you locate the spot, hit Circle to enter. Inside the cavern, move towards the ledge ahead of you until the exclamation mark appears. Jump up onto the ledge and grab the Tent from the chest. Hop back down and head north. When the ! appears, jump up, then proceed north to the next screen. Head to the far right on this screen and go up the stairs. Examine the ice wall and VIVI will burn through with a fire spell. Collect the Ether beyond, then move back towards the center of the room. Don't go up the stairs on the left, though; instead, head down the center path and circle around behind the stairs. Grab the Potion from the chest, then go up the stairs. Go north to the next screen. This room consists of a series of icy ledges; start by heading east. Climb up the log, but don't activate the ! that appears when you approach the log. First, claim the Potion from the chest on the far side of the log, then climb back down and hit the ! to have VIVI unfreeze the log and knock it down. Descend and pick up the Mage Masher knife from the chest. Not only is stronger than Zidane's current Dagger, it offers the Discover ability, which lets you see what stealable items an enemy is carrying -- and still has Flee! In other words, there's no reason not to equip it. Do so, then climb back up the log. Head north and work your way to the far wall. Search the discolored spot and VIVI will blaze through. Grab the Elixir in the cave beyond, then go right and out of the screen. Head northeast and grab the Phoenix Down from the waiting chest. Walk west as far as you can; there's another thin wall that you can burn through (it's marked by an !, of course). Enter the it reveals and head south until you come out on a ledge with a chest. Open it for a more powerful Wrist -- it's the same kind that the Prisoncage carried. Give to VIVI if he doesn't already have one (he learns Blizzard from it); otherwise, equip it on Zidane. After obtaining the new wrist, return through the passage and head east, then north. Go through the cave door and you'll be at a fork. Take the left fork to locate a frozen Moogle. VIVI, of course, unfreezes him, and you can avail yourself of his file management services. This also triggers an A.T.E. that offers you more battle tutorials. Be sure to save, then head back south and take the right fork. An automated sequence follows in which everyone collapses from the cold.
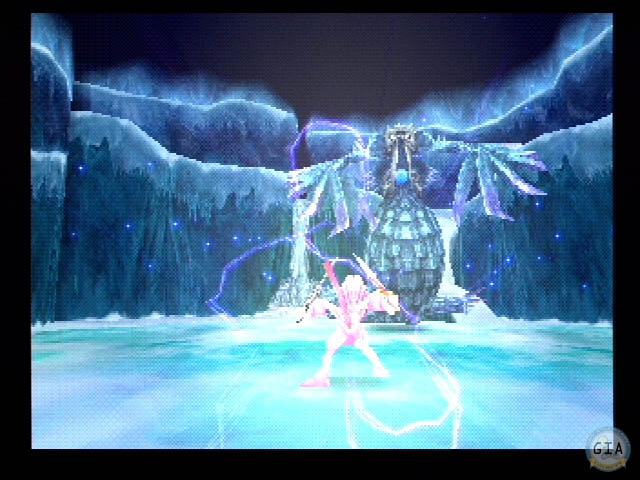
Zidane eventually awakens. Make sure he's fully healed, then follow the trail to the north. One of the Black Waltz mages, sent by Queen Brahne, swoops down and attacks. Before the battle actually starts, the mage summons a huge serpent, and you have to fight both at once. Attack Black Waltz 1 first; he's only got about 250 HP. You'll probably need to interrupt your attacks to heal Zidane with a Potion; the combination of the mage's spells and the Sirion's attacks will drain your HP quickly. Once the mage is defeated, go after the 500 HP-Sirion. (You may be able to steal a Mithril Dagger from the serpent, though you'll often end up with just an Ether.) If Zidane gets into Trance mode, you can hit the Sirion with Frenzy for over 350 points of damage. However, doing so causes the monster to retaliate with a tidal wave attack that does 100 damage -- go ahead and use the attacks, just make sure you've got at least 150 HP first. As usual, you receive no experience for beating the boss, but insted earn 5 AP. Zidane returns to the other members of the party and they rejoin. Continue northeast and climb up the trail on the east side of the screen. Use the two exclamation marks to jump across the waterfall. On the next screen, just proceed forward. As you leave the area, you'll finally be given the chance to name Garnet. (Her default name is actually "Dagger", her nickname.) Choose the first option to approve the name or the second to re-enter it. [next chapter] » Tilting at Windmills |
|
||||||||||||||||||||||||||||||